
 Turning rain into a steady water source isn’t just for off grid folks or hardcore preppers. I’ve built simple rainwater collection systems for less than the cost of a summer water bill, and the benefits always stack up: you get to use less tap water, save money, and have peace of mind for those dry spells or emergencies. Plus, rainwater is just right for plants. There’s no chlorine, no weird additives—just what they want.
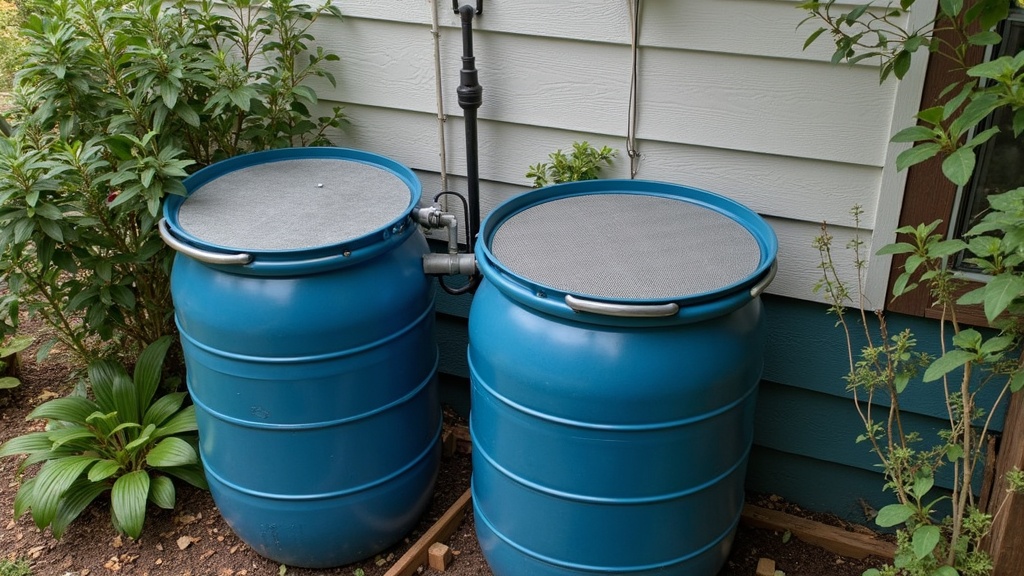
Collecting rainwater starts with a simple idea: your roof is the catchment, your gutters and downspouts channel the flow, and sturdy barrels or tanks store it for whenever you need it. You don’t need fancy equipment. A few food grade barrels, mesh screens, and some basic hardware go a long way. Here’s what I’ve picked up about building a practical system that can turn even a small roof into a surprisingly reliable backup supply. If you’re new to this, keep reading—there’s plenty you can try, even on a tight budget.
Why Build a Rainwater Collection System?
Every homesteader runs into moments when conserving water just makes sense. Here’s what I’ve noticed since setting up my first system:
- It’s easy to lower your water bill, especially if you water gardens or livestock regularly.
- You rely less on city or well water, which comes in handy during shortages or restrictions.
- Rainwater is clean for outdoor uses, plus plants really thrive on untreated water.
- During outages or natural disasters, having barrels full of water is one less thing to worry about.
Regulations on collecting rainwater change depending on where you live. I always suggest checking local rules before getting started. Usually, you’re good to go for non-potable uses, but a quick check can save hassle down the line. Some places offer rebates or support for rain harvesting—another reason to track down those details before you start!
Assessing Your Needs & Planning Your Setup
I always start by figuring out how much rainwater I can actually collect. Here’s a straightforward formula I use:
Gallons Collected = Catchment Area (sq ft) × Rainfall (ft) × 7.48 × Runoff Coefficient
For example, a 1,000 square foot roof and an inch of rain (which is about 0.083 ft), with typical shingles (runoff coefficient of 0.9):
- 1,000 × 0.083 × 7.48 × 0.9 = about 560 gallons per inch of rain.
Pretty impressive for a single storm! When figuring out where to put barrels, I look for the lowest edge of the roof and pick a firm, level spot underneath a downspout. Elevating barrels helps a lot—even a couple of cinder blocks can give you a decent gravity flow. If you want to pump water further, planning your setup with hose lengths in mind will help you out as seasons change.
Checklist Before You Start
- Check local rainwater harvesting laws.
- Measure your roof area (just length × width works for rectangles).
- Scope out your gutters and most accessible downspouts.
- Decide if you need the water for gardening, livestock, or emergencies (drinking requires more equipment).
Building the Basic System: What You’ll Need
I’ve kept most of my setups simple, but a few key components make all the difference in keeping things clean and leak-free. Here’s my core supply list:
- Food grade barrel or tank (50–55 gallons)—Used pickle or syrup barrels work well, just clean them thoroughly first.
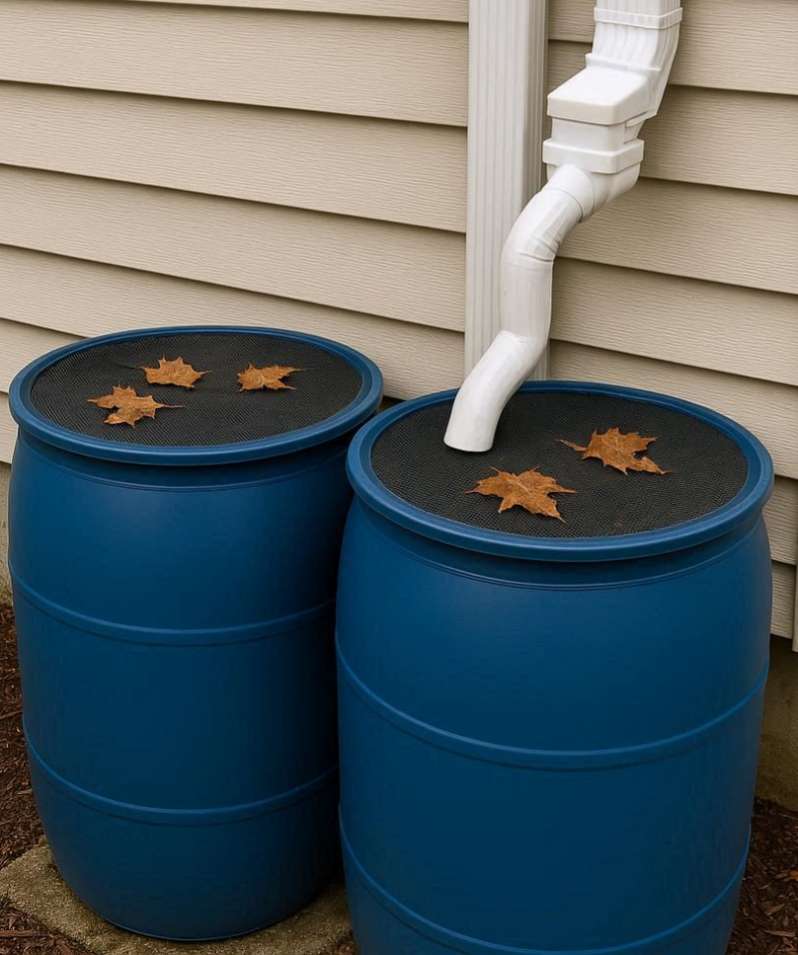
- Downspout diverter kit—Lets you route rainwater into your barrel while allowing overflow when it’s full. You can DIY this, but kits are affordable and fit standard downspouts.
- Mesh screen—Keeps leaves and bugs out. Fine stainless mesh or nylon works well.
- Spigot and overflow fitting—For filling watering cans or hooking up hoses, plus an overflow pipe to direct excess water away from your home’s foundation.
- Drill and hole saw (for barrel prep)
- Pipe sealant or O-rings—Keeps fittings from dripping.
Putting it All Together
- Clean and rinse the barrel; get out any syrup, vinegar, or residue.
- Cut the downspout just above barrel height, and set up the diverter or flex hose to direct flow.
- Drill holes for the spigot (near the bottom), overflow pipe (near the top), and screen (on top or side opening).
- Add mesh over all openings and secure it tightly.
- Set the barrel up on a flat, elevated surface. Cinder blocks or a simple wood stand work great.
- Test all connections by running a garden hose into the gutter to look for leaks or blockages. Adjust fittings as needed until water flows just right and nothing drips where it shouldn’t.
Tweaks & Upgrades for a Better System
After my first rainy season, I found a few tweaks that made life a lot easier:
- Firstflush diverter—This clever add-on discards the first few gallons of each rainfall, so dirt and pollen off the roof don’t end up in your tank. Kits are available, or you can set one up with PVC pipe and a ball valve.
- Linking multiple barrels—A few inches of flexible hose or hard PVC lets you chain barrels and really boost your storage.
- Pump systems—If you want higher pressure for sprinklers or washing, a small solar or electric pump can move water uphill or fill livestock troughs quicker than gravity alone.
If you want to use rainwater for drinking or cooking, things change a bit. Always use a metal, slate, or tile roof; never collect off asphalt shingles or roofs treated with chemicals. Filtration needs to be thorough:
- Sediment and carbon filter (removes fine particles and odors)
- Reverse osmosis or ceramic filter for deep cleaning
- UV or chemical disinfection step (like UV wands or small chlorine doses)
- Remineralization filter if you’ll drink it long term, since rainwater is naturally soft and can leach metals from pipes
Take care to test your water regularly if you set up a potable system. Many homesteaders stick with rainwater just for irrigation and animal uses, but the option is out there if you want to make it happen.
Regular Maintenance: Keeping It Clean & Trouble Free
Even a low maintenance setup needs some attention. I write cleaning days on my calendar—usually before rainy season and halfway through. Staying on top of cleaning will mean less trouble and cleaner water for your garden, animals, or even emergency use.
- Gutters and screens: Scoop out leaves and rinse screens at least twice a year. Plugged gutters will turn a rainstorm into a mess.
- Tank cleaning: Drain barrels every so often (especially before spring) and scrape out any muck at the bottom.
- Check for algae: Keep barrels opaque or paint them a dark color to block sunlight; clear barrels turn into science experiments quickly!
- Seal up all entry points: Mosquitoes thrive in open water. Make sure every opening has fine mesh or a tight-fitting lid.
This bit of upkeep keeps your water clear and your system running well season after season. If you use rainwater for drinking or animal use, keep an eye out for any weird smells or visible gunk—addressing small problems right away is always better than waiting for trouble to spread.
Common Rainwater Harvesting Questions
Is rainwater safe to use for drinking?
For drinking, you’ll need extra filtration and a safe catchment surface (like tile or metal). Most people keep to using rainwater for the garden, cleaning, or livestock unless they’re really set up for purification. It’s possible, but you have to take some extra steps and test regularly.
How much rain does it take to fill a barrel?
Even a half inch of rain on a modest roof can fill a standard 55gallon barrel. If you get a lot of rain, overflow pipes are super important to avoid flooding your yard next to the house. Long periods of rain might require more barrels, so watch how often you need to empty yours or chain a few together.
Do I need a pump for my system?
If you raise the barrel at least a foot or two and use thick hoses, gravity usually provides enough pressure for watering. For sprinklers or longer hose runs, a small pump is a nice addition and makes watering way easier. Some people even put in solar pumps for an Eco-friendly boost.
Ready to Start Collecting Rain?
Building a rainwater collection system is totally doable for most homesteads: urban, rural, or somewhere in between. Start simple, see how you like it, and add as you go. A barrel under your back gutter is miles better than nothing, and you can always add barrels, filters, or pumps as your needs grow. Every gallon you stash is less pressure on your well or water bill, and it feels great to fill watering cans straight from your own supply after a good storm.
Your Next Steps:
- Pick the downspout with the best runoff after rain and measure your roof area.
- Track down a food safe barrel and a diverter kit—local bakeries or bottling plants sometimes give away clean barrels.
- Get everything set up before your next rainy season rolls through. Doing a test run with a garden hose is a great way to check your system for leaks before the rain comes.
Have questions or want to share your rainwater system story? I’m always excited to hear about those first rain barrels filling up. Drop your tips or stories below; connecting with other collectors always sparks new ideas and improvements!