
Baking at home is a blast, but all that fun can come to a halt when something flops and you can’t figure out what went wrong. Over the years, I’ve found that getting baking measurements right truly makes or breaks the result. Just a little too much flour or not quite enough butter can ruin the whole thing. Based on all my trial and error, here’s what I’ve learned about measuring and swapping ingredients so your cookies put smiles on faces instead of leaving people disappointed.
Measure Like a Pro (and Save Your Cookies)
Ever pulled cookies out of the oven to find that they’ve merged into one giant cookie puddle? Or sliced into a cake that’s so dense you could use it to hold down papers? Chances are, your measuring habits are to blame.
Baking seems like art, but it’s truly a science, and science means being precise. Here’s my quick guide for getting it right every time:
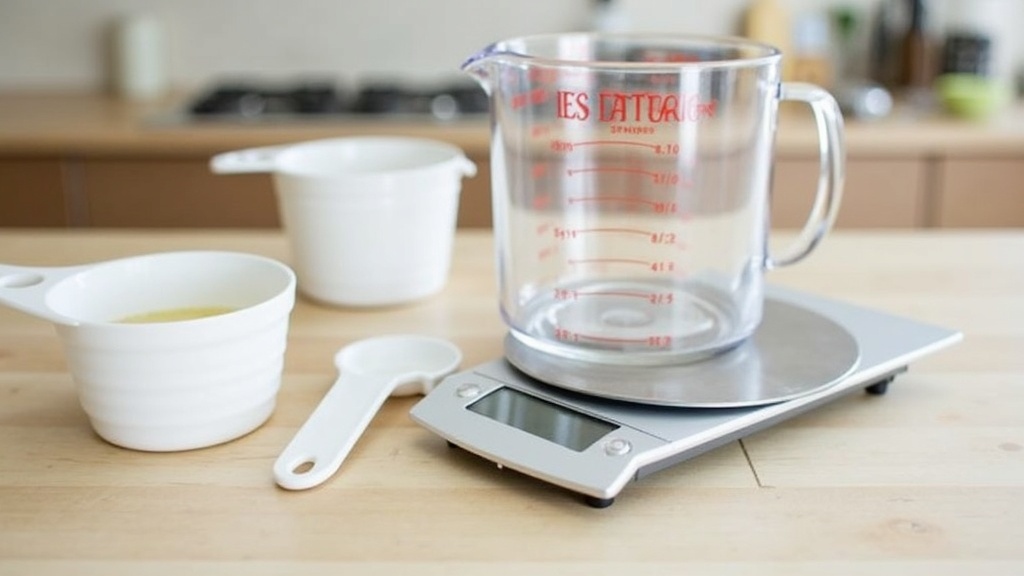
- Get a digital kitchen scale.
Measuring by weight is much more reliable than using cups. If you scoop flour with a cup, your recipe could be off by up to 30%. That’s a recipe for disaster. A scale keeps everything reliable; brownies turn out fudgy instead of cakey. - Respect the liquids.
Always use a clear measuring cup, set it on the counter, and check it at eye level. No guessing or “close enough.” You might feel silly crouching down to see, but your cake will turn out right. - Flour and sugar have different rules.
Flour: spoon it lightly into the cup and level it off. Brown sugar: pack it in tightly. These small differences make a big impact. - Common mistakes lead to common flops.
Scooping flour straight from the bag makes for a brick-heavy cake. Reading the liquid cup while holding it lets in errors, making for dry muffins. Skip the scale and you’re rolling the dice with your results.
The Takeaway:
If you want bakery-worthy consistency, measure smart. Weigh your dry ingredients, read liquids at eye level, and stop trusting cups to always be right. In baking, being precise is the secret ingredient you didn’t know you needed.
Why Accurate Measurements Matter in Baking
Baking isn’t just following directions; it’s really chemistry in action. Even one tablespoon more or less of something can alter the outcome. I’ve watched my muffins turn from fluffy to dry for no reason—except for a slight measuring error. When you measure carefully, you get the same tasty treats every time.
Some recipes say “a pinch,” “a dash,” or “about a cup,” but that approach is better suited to cooking, not baking. For cakes, bread, and cookies, those small changes really count. Too little flour and your cookies turn greasy; too much baking soda and pancakes taste metallic.
Common Baking Measurements Explained
Recipes juggle between volume and weight, and it can get confusing if you switch from one to the other. Here’s a rundown of what I keep an eye on:
- Volume: Cups, tablespoons, and teaspoons. In the US, standard measuring cups are 1 cup, 1/2 cup, 1/3 cup, and 1/4 cup sizes. Teaspoons and tablespoons measure small amounts such as baking powder or vanilla.
- Weight: Grams and ounces. A lot of international recipes (and professional bakers!) stick to weights to avoid mistakes from packing, scooping, or sifting.
- Liquids vs. dry: Use dry measuring cups for flour or sugar; use clear liquid measuring cups for milk, oil, or water. Even though they technically measure the same volume, mixing them up can throw recipes off.
How to Measure Ingredients Properly
- Flour: Fluff it first, spoon into the cup, and level it off. Don’t scoop—otherwise you’ll get too much.
- Sugar: Granulated sugar is fine to scoop and level. Brown sugar should be firmly packed. Powdered sugar is spooned and leveled unless the recipe asks for it sifted.
- Liquids: Always pour into a clear measuring jug set on a flat surface. Check the level at eye height for accuracy.
- Baking soda/powder: Scoop in and level off gently. Don’t heap, or you’ll throw the flavor or rise off balance.
Baking Measurement Conversions
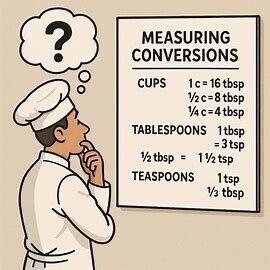
If you’re working from a recipe that calls for grams when you’re used to cups, these conversions should help:
- 1 cup flour ≈ 120 grams
- 1 cup granulated sugar ≈ 200 grams
- 1 cup brown sugar (packed) ≈ 220 grams
- 1 cup butter ≈ 227 grams (about 2 sticks, US)
- 1 tablespoon = 3 teaspoons
- 1 cup = 16 tablespoons
I keep a printed conversion chart on my fridge and use online calculators when I want to size recipes up or down. Shopping for a simple digital kitchen scale can also make converting much easier.
Baking Substitutions: What Works (and What Won’t)
Many times, you’re in the middle of baking and notice something’s missing. Swapping ingredients can sometimes work, and other times, it just creates a bigger headache. I’ve baked a lot of strange cookies by using oil instead of butter, or ending up with cake that has a weird texture after running out of the right sugar.
Typical Baking Substitutions (And How They Affect Results)
- Butter → Oil: Works for cakes and brownies, but less so for cookies (they’ll spread more and the flavor is different). Use 3/4 the oil for every cup of butter.
- Buttermilk → Milk + Vinegar: Just add 1 tablespoon vinegar or lemon juice per cup of milk, and let it sit for a few minutes.
- Eggs → Flaxseed or Applesauce: Replace one egg with 1 tablespoon ground flaxseed plus 3 tablespoons water (let it gel) or 1/4 cup unsweetened applesauce. Your baked goods will be less fluffy, but it works for dairyfree or vegan options.
- Baking powder and baking soda: These aren’t totally interchangeable. Use this quick fix: 1 teaspoon baking powder is the same as 1/4 teaspoon baking soda plus 1/2 teaspoon cream of tartar.
- Allpurpose flour and whole wheat flour: You can swap about half without much change, but if you swap it all, baked goods get denser and have a nuttier flavor.
Knowing What’s Safe to Sub
Substitutions can save time and the day, but not every swap is equal. Switching fats (like butter and oil), leavening (baking soda or powder), and flour types all impact the final product’s texture and rise. If you need to adapt for special diets, check resources like King Arthur Baking’s substitution guide, which explains the science of what swaps are safe and why.
Baking Measurement Mistakes I See All The Time
- Packing flour: This makes cakes and cookies dense and heavy. Always spoon and level!
- Brown sugar not packed: If you scoop it loosely, your treats could turn out dry or lack sweetness. Pack it down for accuracy.
- Mixing up ingredient cups: Using the wrong measuring cups for dry or wet ingredients messes up recipes. Grab the right tool every time.
- Forgetting to zero the scale: Not “taring” the scale between additions can throw everything off. Always double-check your scale is at zero before adding ingredients.
Tips For Fixing Mishaps When You Can’t Start Over
- Cookies spreading too much? Pop the dough in the fridge for 20 minutes before baking to help them keep their shape.
- Flat cakes? Make sure your baking powder or soda isn’t expired. Whipping and folding in a little egg white can sometimes give that last minute boost if needed.
- Baked goods too dry? Brush with simple syrup or a little milk; a soak can revive a dry cake or muffin.
Real-World Examples: Measurement Swaps in My Kitchen
There have been plenty of times when I had to swap ingredients in a pinch:
- Greek yogurt in banana bread instead of sour cream, which added a tangy twist and kept things moist.
- Using half whole wheat flour in pancakes. My family barely noticed the difference, and they still tasted great.
- Ran out of white sugar, used brown instead. The cookies turned chewy, a little darker, and everyone loved the deeper flavor.
The trick is to know what role each ingredient plays—structure, sweetness, or moisture—then pick substitutes that keep things balanced.
Frequently Asked Questions
Question: Why do my cakes turn out dense?
Answer: Measuring too much flour or not enough liquid often results in dense cakes. Always spoon and level your flour and weigh your ingredients for the best texture.
Question: Can I use almond flour instead of allpurpose?
Answer: Not for a straight swap. Almond flour bakes up differently, so only use it in recipes that call for it—otherwise, you’ll get dense, sometimes oily results.
Question: My recipe is in grams, but I use cups. How do I handle it?
Answer: Find an online conversion tool or use a printed chart. Weighing is more consistent, so if you bake often, a digital scale is a smart investment.
Baking Measurement Tools Worth Having
- Digital kitchen scale: Best for getting precise measurements with dry ingredients and even some liquids.
- Set of measuring cups and spoons: Useful for smaller, more exact quantities.
- Glass or clear measuring jug: Crucial for tackling liquid measurements accurately.
- Fine mesh sifter: Great for de-lumping flour, powdered sugar, and cocoa—all for a smoother batter.
Baking doesn’t have to be uncertain. Once you get measurements right and make smart swaps, home baking turns from a stress-fest into a simple, satisfying activity. Keep your tools within reach, post a conversion chart nearby, and double-check everything when swapping ingredients. With some practice and a sharp eye for detail, your baking can quickly go from “why is this so bad?” to “these are amazing!” almost every time.